
 |
| Create your own digital greeting card |
Friday, December 23, 2011
Friday, April 15, 2011
DAY 4_MARK'S FINEST PAPERS APRIL BLOG HOP_GARDEN FAIRIES
Welcome to the MFP April Blog Hop! This month, we are releasing 4 NEW SETS!
Our New Sets are: In My Mother's Garden, Bearded Iris, Oh Boy, It's a Girl and Garden Fairies.For your convenience, all 4 stamp sets are available for purchase TODAY!
We have a NEW Blog Candy Contest! BE A GUEST DESIGNER!***
What do you need to do to qualify? Just comment on the Design Team blogs during the blog hop. The winner will be announced on the Mark’s Finest Papers blog on Saturday, April 16, 2011. ***See the MFP blog for all the contest rules and PRIZES!
FRIDAY, April 15, 2011: Garden Fairies
Emily-
Karen-
Patty-
Roxie-
Vicki-
Liz:
Claudine-
Dawn-
Nicole -
Marilynn-
Peggysue-
Connie –
Emily N.-
Neva
Silvia
Patricia
Chrissy
Guest Designer, Lillian
Mark’s Finest Papers
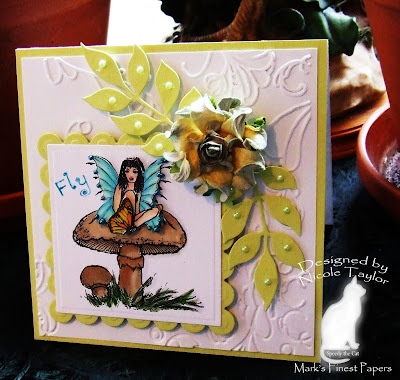
I love fairies and collect fairie books and love to read all thing fairie so this is a terrific set for me.
The first card was made using Lime Squeeze and Snow Storm White cs from MFP.
I love these colors together.
I inked this pretty fairie image 2 times in Palette Noir black and colored with Copic markers. I also added some teeny tiny aqua pearls to the tip of her wings. I then die cut one image with a plain Nestie and the second I line cut just the fairie and popped it over the main panel image. I then added a die cut Nestie scalloped mat.
The bg is embossed with a folder I received as a gift.
To embellish my card I used Doohickey die cut leaves with tiny pearls in the leaves and finished with a gorgeous paper flower.
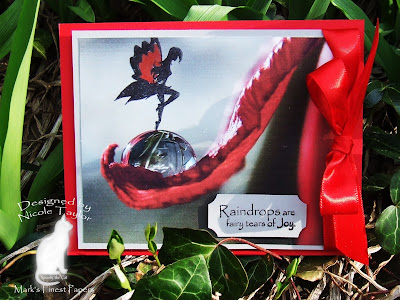
The second card I made for yesterday SCS challenge. I have this beautiful picture of a rain drop in a leaf "I don't know who the photographer is" and though it would be perfect to show this cute fairie silhouette.
The image is inked in Palette Noir with the inside of wings colored with a red Copic marker.
I added a sentiment tag and a gorgeous red ribbon bow.
Clean and simple, I also really like how this one turned out.
Have a wonderful weekend, Nicky
Our New Sets are: In My Mother's Garden, Bearded Iris, Oh Boy, It's a Girl and Garden Fairies.For your convenience, all 4 stamp sets are available for purchase TODAY!
We have a NEW Blog Candy Contest! BE A GUEST DESIGNER!***
What do you need to do to qualify? Just comment on the Design Team blogs during the blog hop. The winner will be announced on the Mark’s Finest Papers blog on Saturday, April 16, 2011. ***See the MFP blog for all the contest rules and PRIZES!
FRIDAY, April 15, 2011: Garden Fairies
Emily-
Karen-
Patty-
Roxie-
Vicki-
Liz:
Claudine-
Dawn-
Nicole -
Marilynn-
Peggysue-
Connie –
Emily N.-
Neva
Silvia
Patricia
Chrissy
Guest Designer, Lillian
Mark’s Finest Papers

I love fairies and collect fairie books and love to read all thing fairie so this is a terrific set for me.
The first card was made using Lime Squeeze and Snow Storm White cs from MFP.
I love these colors together.
I inked this pretty fairie image 2 times in Palette Noir black and colored with Copic markers. I also added some teeny tiny aqua pearls to the tip of her wings. I then die cut one image with a plain Nestie and the second I line cut just the fairie and popped it over the main panel image. I then added a die cut Nestie scalloped mat.
The bg is embossed with a folder I received as a gift.
To embellish my card I used Doohickey die cut leaves with tiny pearls in the leaves and finished with a gorgeous paper flower.
The second card I made for yesterday SCS challenge. I have this beautiful picture of a rain drop in a leaf "I don't know who the photographer is" and though it would be perfect to show this cute fairie silhouette.
The image is inked in Palette Noir with the inside of wings colored with a red Copic marker.
I added a sentiment tag and a gorgeous red ribbon bow.
Clean and simple, I also really like how this one turned out.
Have a wonderful weekend, Nicky
Thursday, April 14, 2011
April Blog Hop Day 3 "My Mother's Garden"
Welcome to the MFP April Blog Hop! This month, we are releasing 4 NEW SETS!
Our New Sets are: In My Mother's Garden, Bearded Iris, Oh Boy, It's a Girl and Garden Fairies.For your convenience, all 4 stamp sets are available for purchase TODAY!
We have a NEW Blog Candy Contest! BE A GUEST DESIGNER!***
What do you need to do to qualify? Just comment on the Design Team blogs during the blog hop. The winner will be announced on the Mark’s Finest Papers blog on Saturday, April 16, 2011. ***See the MFP blog for all the contest rules and PRIZES!
Thursday, April 14, 2011-In My Mother's Garden
Lois
Vicky
Dawn L.
Anne
Emily
Karen
Patty
Roxie
Vicki
Liz
Claudine
Dawn M
Nicole
Marilynn
Geri
Lynn
Neva
Silvia
Guest Designer, Lillian
Mark’s Finest Papers

I think this is my favorite of the new April stamps sets from MFP.
I used Lavender and white as my colors.
The image was stamped with Palette Noir black ink and colored with Copic markers.
I embossed the bg with a basket weave folder and the strip was done with two lengths of embossing strips...one buttons and the other zigzag.
The rest is self explanatory.
I think a wheel barrow full of flowers would look lovely in any garden.
I really love this sentiment.
Happy Hopping and good luck, Nicky
Wednesday, April 13, 2011
Day 2 of Mark's Finest Papers April Blog Hop
Welcome to the MFP April Blog Hop! This month, we are releasing 4 NEW SETS!
Our New Sets are: In My Mother's Garden, Bearded Iris, Oh Boy, It's a Girl and Garden Fairies.For your convenience, all 4 stamp sets are available for purchase TODAY!
We have a NEW Blog Candy Contest! BE A GUEST DESIGNER!***
What do you need to do to qualify? Just comment on the Design Team blogs during the blog hop. The winner will be announced on the Mark’s Finest Papers blog on Saturday, April 16, 2011. ***See the MFP blog for all the contest rules and PRIZES!
WEDNESDAY, April 13: Oh Boy, It's a Girl!
Lois
Vicky
Dawn L.
Anne
Peggysue
Connie
Claudine
Dawn M.
Nicole
Marilynn
Geri
Lynn
Emily N.
Patricia
Chrissy
Guest Designer, Lillian
Mark’s Finest Papers


Today is day 2 of MFP's Blog Hop. I am featuring the set "Oh Boy It's a Girl".
Don't you just love this darling elephant. I inked the elephant and the sentiment with Palette Noir onto a purple plaid and purple dots dp respectively, and line cut the image. All of the dp on this card is from DCWV/Baby Boy. I used bright white cs for the matting.
To add some pizazz I inked the diaper pin with Palette Noir onto the white dotted dp and line cut it also. I tied on a pretty ribbon knot and threaded the diaper pin thru it. I think it's looks cute.
Happy blogging everyone, Nicky
Tuesday, April 12, 2011
BLOG HOP DAY 1 for Mark's Finest Papers
Welcome to the MFP April Blog Hop! This month, we are releasing 4 NEW SETS!
Our New Sets are: In My Mother's Garden, Bearded Iris, Oh Boy, It's a Girl and Garden Fairies.For your convenience, all 4 stamp sets are available for purchase TODAY!
We have a NEW Blog Candy Contest! BE A GUEST DESIGNER!***
What do you need to do to qualify? Just comment on the Design Team blogs during the blog hop. The winner will be announced on the Mark’s Finest Papers blog on Saturday, April 16, 2011. ***See the MFP blog for all the contest rules and PRIZES!
TUESDAY April 12, 2011- Bearded Iris
Lois
Vicky
Dawn L.
Anne
Peggysue
Connie
Emily
Karen
Patty
Roxie
Vicki
Liz
Geri
Lynn
Emily N.
Neva
Silvia
Patricia
Chrissy
Guest Designer, Lillian
Mark’s Finest Papers

This is going to be my Mother's day card for my DMIL.
This is one of the images from the new set "Bearded Iris". This set can be very feminine and perfect for Mother's Day.
I stamped the image 3 times with Palette Noir black ink, colored with Copic markers then line cut the images. I layered some of the petal parts and used pop-up dots to raised the image onto a white oval Nestie shape die cut cs and then layered that over an scalloped oval Nestie die cut on black cs.
The dp is from 7 gypsies/gypsy market variety pack.
I distresses and sponged on black around the edges and mounted to a black mat.
My embellishment on this card is a threaded black ribbon with a pretty acrylic flower.
Happy hopping and good luck to every one, Nicky
Monday, April 11, 2011
Sneak Peek of "Oh Boy It's a Girl" by Mark's Finest Papers and the SCS, CAS114 challenge.

This is a sneak peek of Mark's Finest Papers new set "Oh Boy It's a Girl".
http://www.marksfinestpapers.com/servlet/StoreFront
That little cutie in the picture is my new Great Grandson Jackson.
I paper piece the giraffe with a green polka dot dp.
I popped the bow around his neck and added a green gem to match.
I only used dp on this card it's by DCWV/Nursery/Baby Boy.
I used a punched for the edging and a cute ribbon simply knoted. The sentiment is inked in Palette Noir.
Nicky
Friday, April 8, 2011
Sneak Peek of "Garden Fairies" by Mark's Finest Papers and the F4A59 challenge

http://www.marksfinestpapers.com/servlet/StoreFrontFor the papers I used BoBunny and cs from MFP.
The image and sentiment are stamped with Versafine/Sepia. The embossing folder is from Sizzix.
I added this beautiful chocolate silk ribbon to finish.
Have a nice weekend, Nicky
Subscribe to:
Posts (Atom)


